Get started - add your details!
Welcome to TripMapper for Business! 👋
Let's get you up and running! Below, we guide you through adding your information to the 'Settings' section of the platform.
Next steps
1. Personal profile
When creating your new TripMapper for Business account, you would have added basic personal information. Complete your personal profile by following the steps below:
Click the avatar in the top right corner of your screen. Then click 'Settings.'
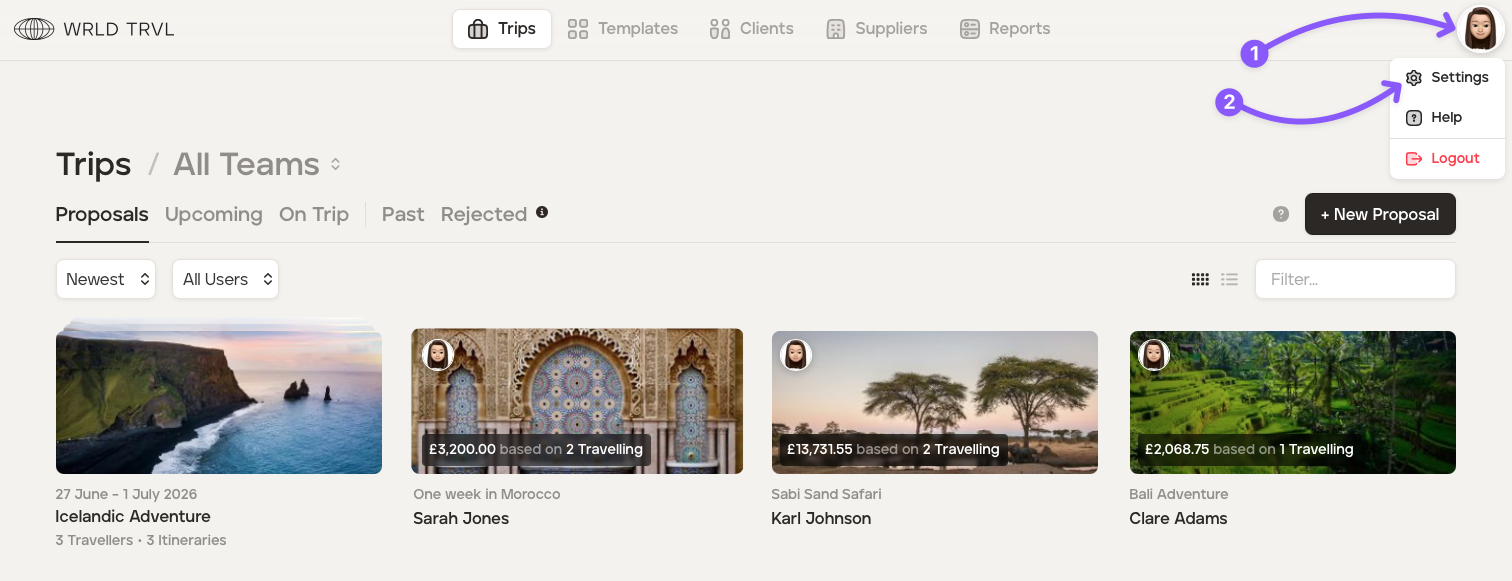
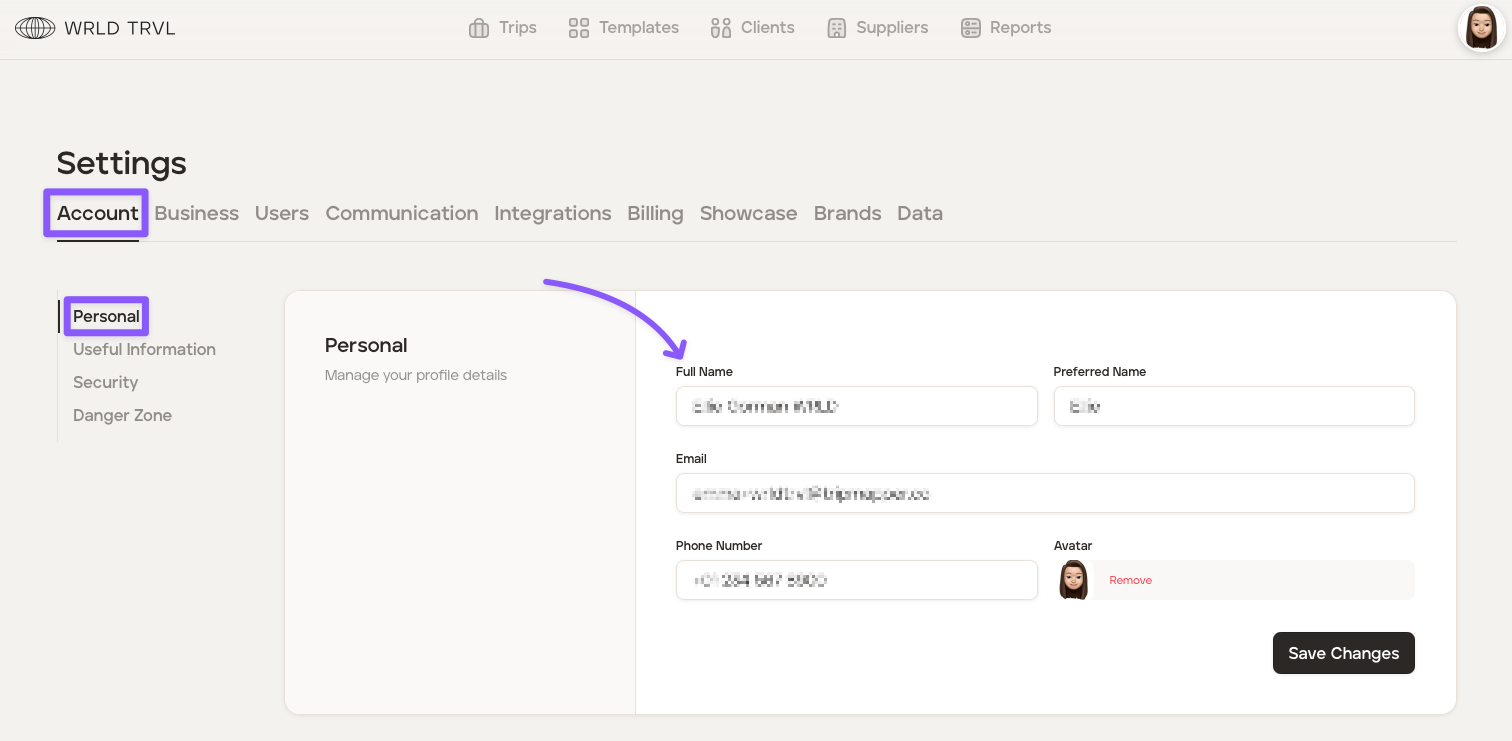
Click the 'Account' tab.
Click the 'Personal' section.
Complete your personal profile details.
Click the 'Save Changes' button.
2. Company information
When creating your new TripMapper for Business account, you would have also added basic company information. Complete your company profile by following the steps below:
Remain in 'Settings' (or click the avatar in the top right corner of your screen and then click 'Settings').
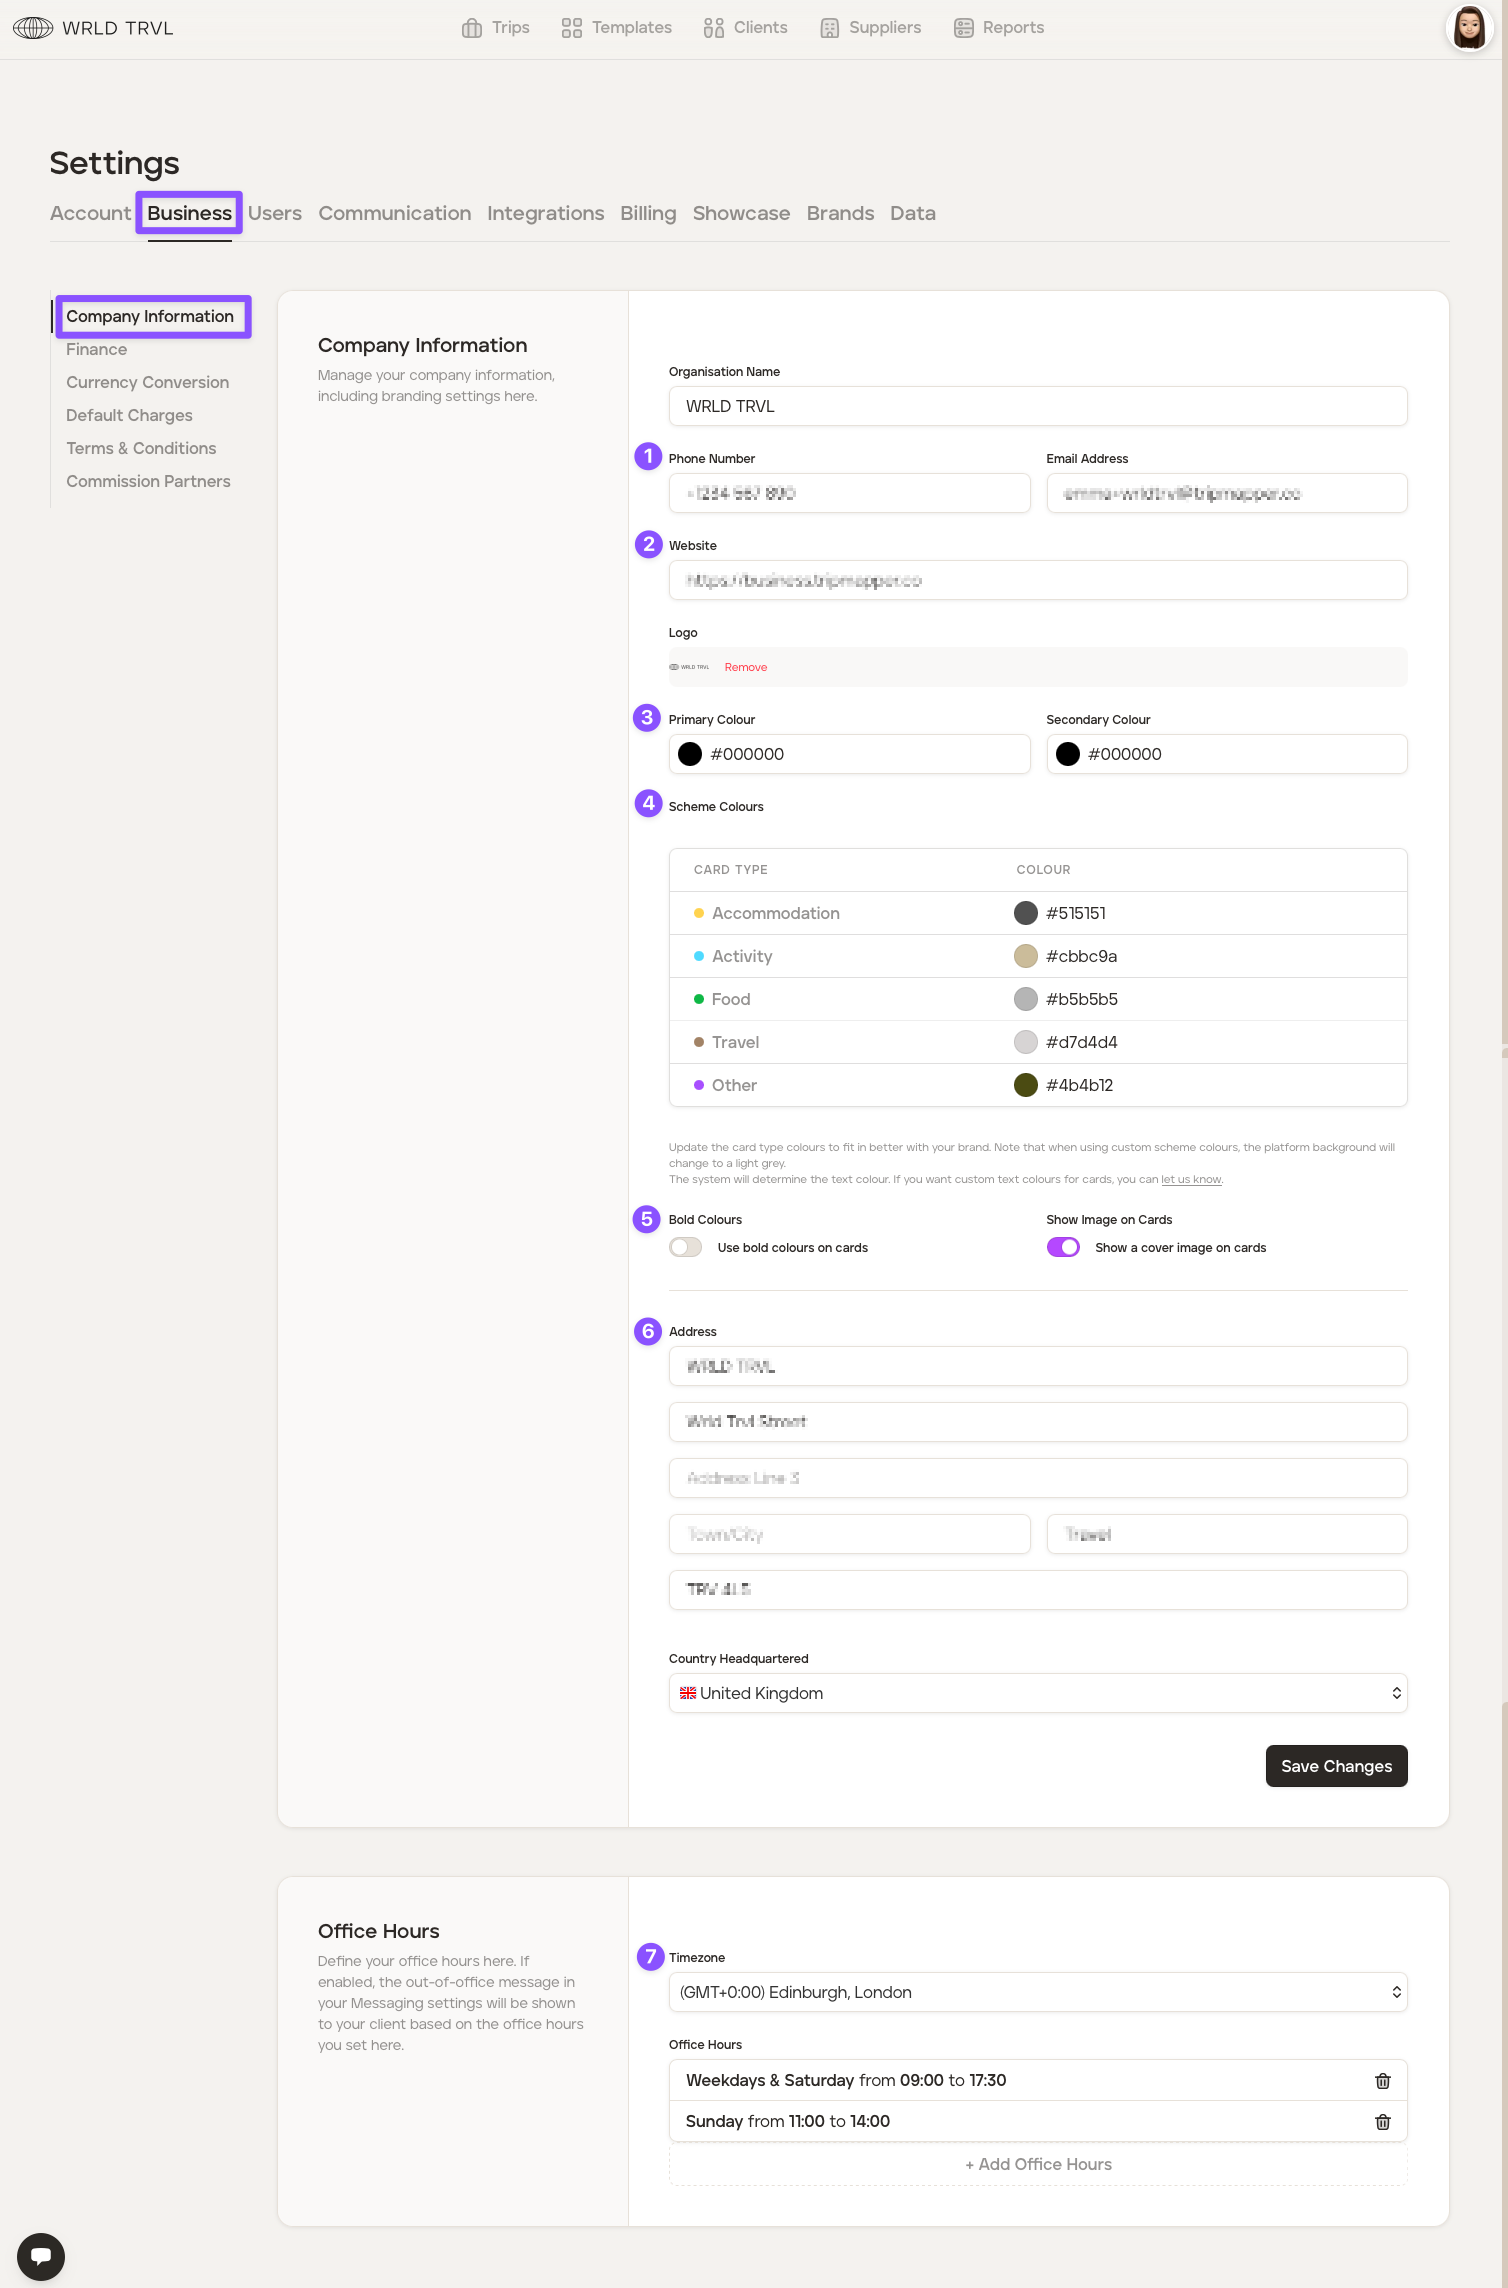
Click the 'Business' tab.
Click the 'Company Information' section and complete the company information (see annotated screenshot below):
Add your company phone number and email address.
Add your company website.
Add your company's primary and secondary colours using hex colour codes. You should be able to get these colour codes from your brand guidelines or use this helpful colour picker website. Hex colour codes start with a hashtag (#) and are followed by six letters and/or numbers.
TripMapper uses different card types to organise items on itineraries ('Accommodation', 'Activity', 'food', 'Travel' and 'Other'). Each card type has a different default colour, which you can see in the 'Scheme Colours' section. You may keep the default colours or change the colours using hex colour codes to be more in line with your company's brand guidelines.
Choose whether or not to show card category colours in bold when in the 'Card View' layout. Bold colours are the default setting, but to change to subtle card category colours, use the switch. Find out more read the Choose bold or subtle card colours on Card View layout article.
Add your company address.
Add your timezone and office hours (useful if you want to use the in-app messaging functionality - find out more below).
Click the 'Save Changes' button.
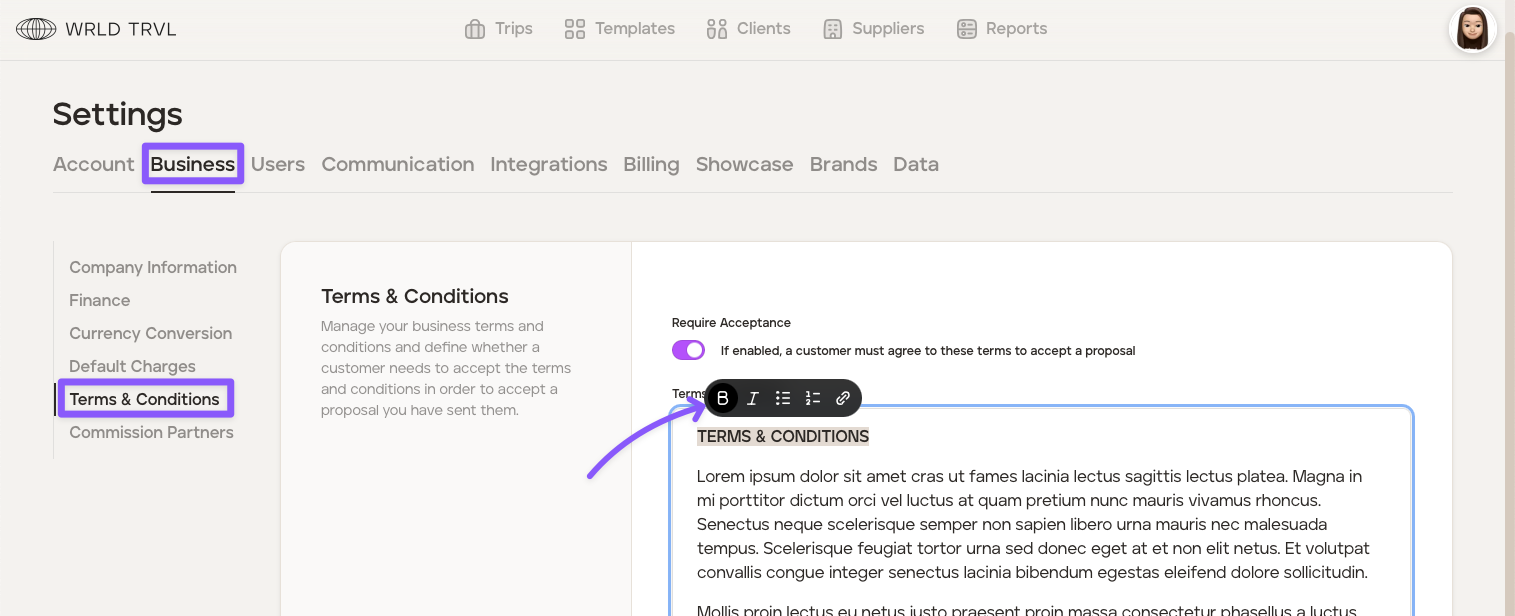
3. Add your terms and conditions
You may want your client to review and accept your company’s terms and conditions in order to approve a proposal you have sent them. To set this up, follow the steps below:
Remain in 'Settings' (or click the avatar in the top right corner of your screen and then click 'Settings').
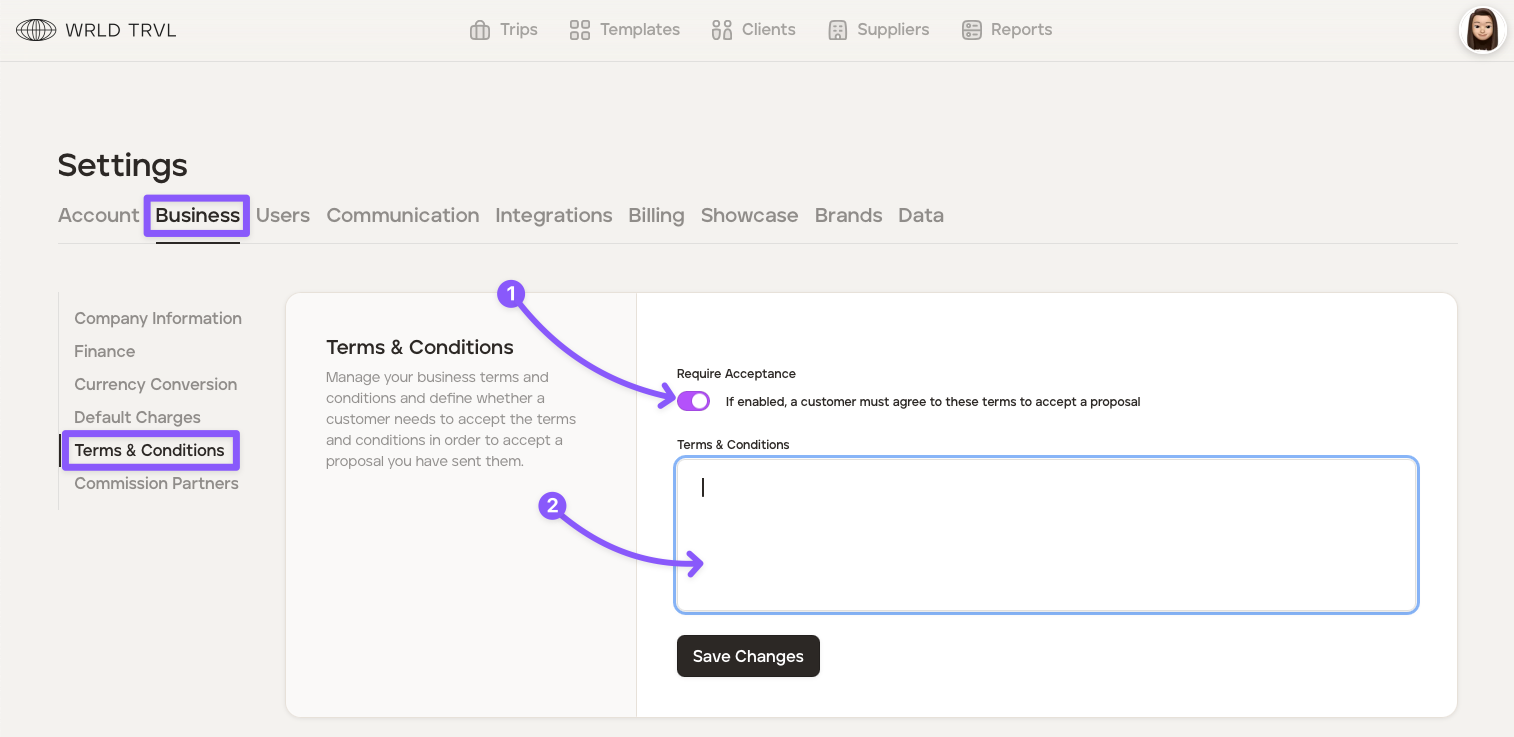
Click the 'Business' tab.
Click the ‘Terms & Conditions’ section.
Enable the 'Require Acceptance' switch, which will mean your client must agree to your terms and conditions in order to accept the proposal.
Add your terms and conditions into the 'Terms and Conditions' box. Highlight the text to enable markdown (bold, italics, bullets, etc.).
Click the 'Save Changes' button.
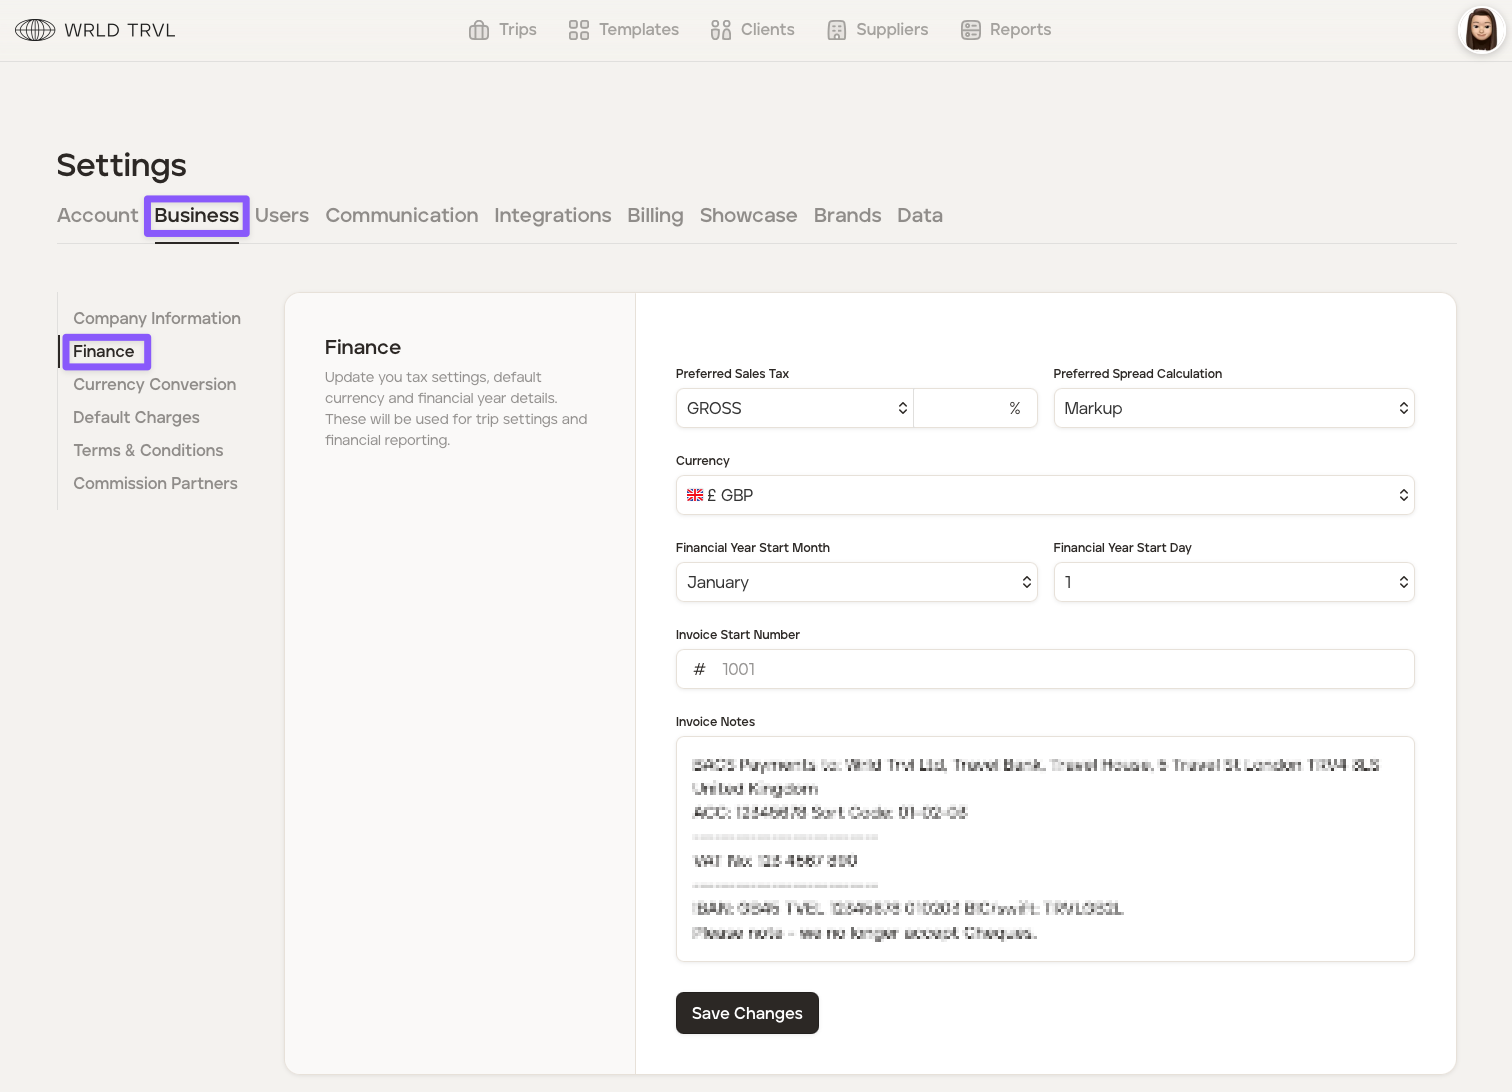
4. Finance
Set up your financial settings to make use of TripMapper's financial reporting, cost management and invoicing functionality:
Remain in 'Settings' (or click the avatar in the top right corner of your screen and then click 'Settings').
Click the 'Business' tab.
Click the 'Finance' section and complete the fields.
Click the 'Save Changes' button.
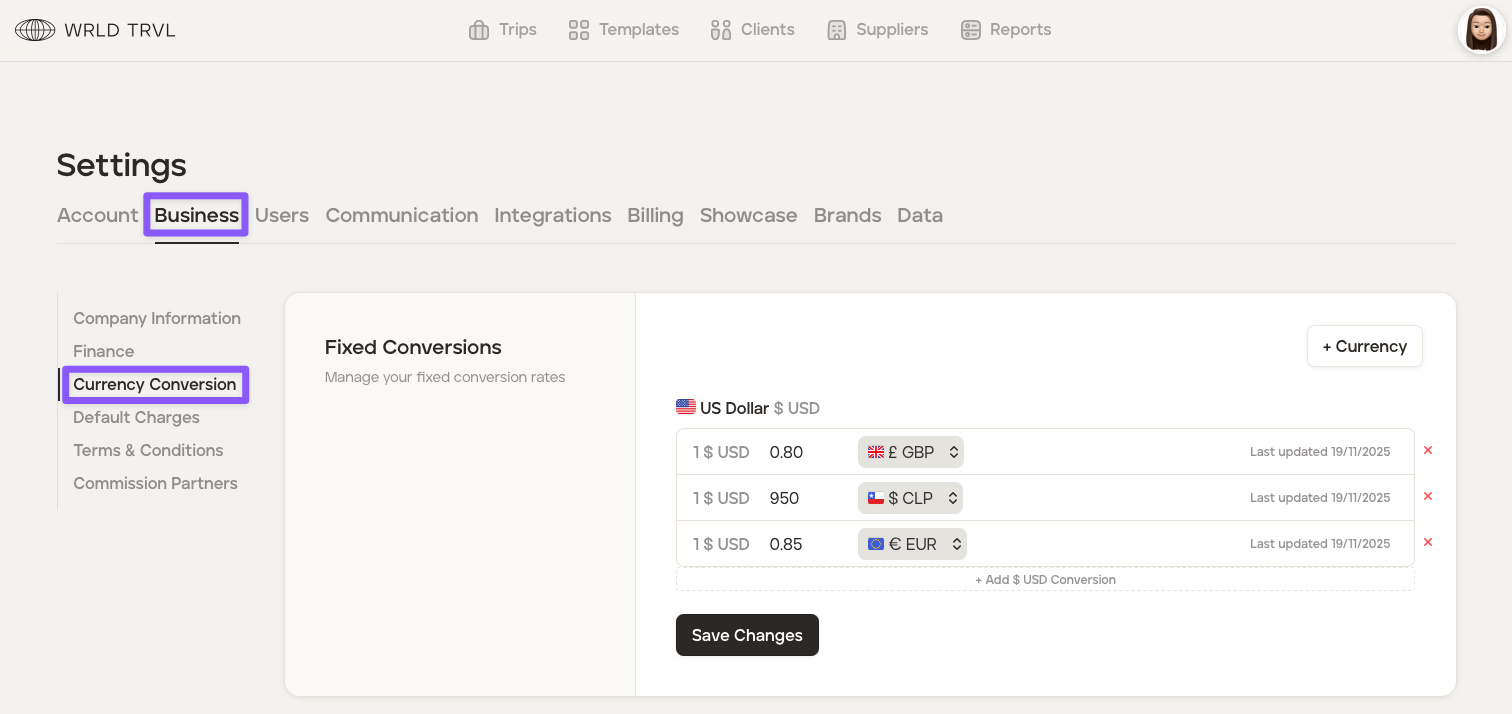
5. Fixed conversion rates (optional)
For businesses operating internationally, fixed currency conversion rates provide a stable foundation for financial planning and budgeting. This stability can help with better control over costs. To set up fixed currency conversion, follow the steps below:
Remain in 'Settings' (or click the avatar in the top right corner of your screen and then click 'Settings').
Click the 'Business' tab.
Click the 'Currency Conversion' section.
Click the '+Currency' button.
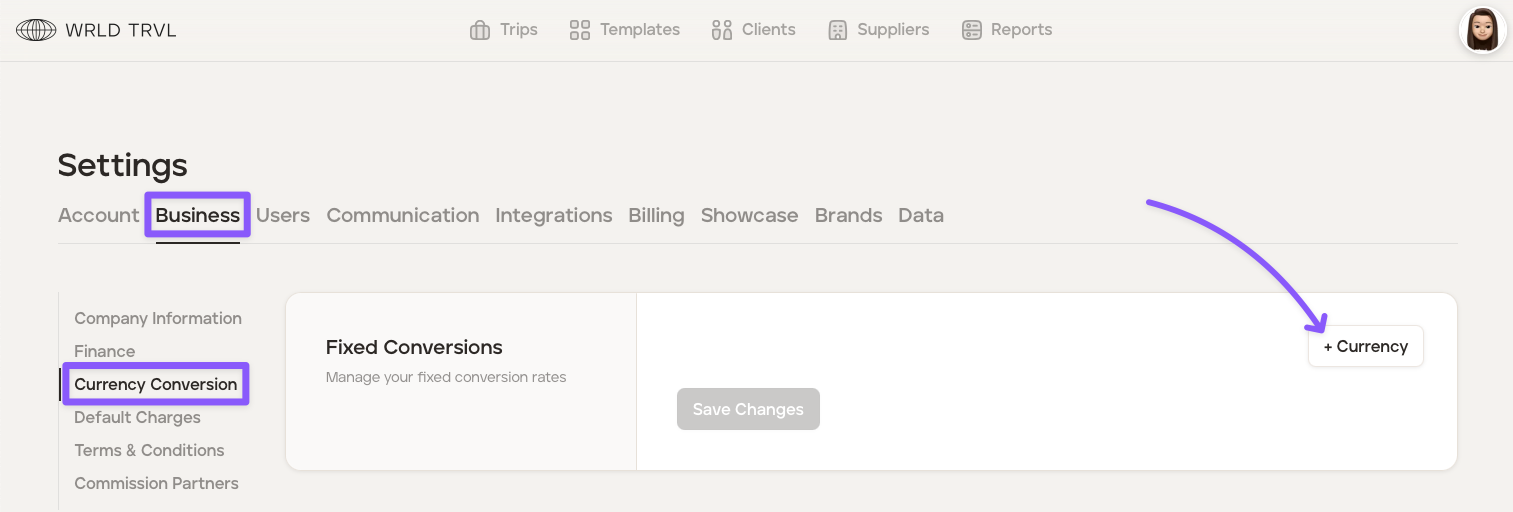
Add the new currency by selecting the currency from the dropdown menu and clicking 'Add Currency.'
Click '+ Add [XXX] Conversion' and then type in your chosen currency and fixed conversion amount.
Click 'Save Changes.'
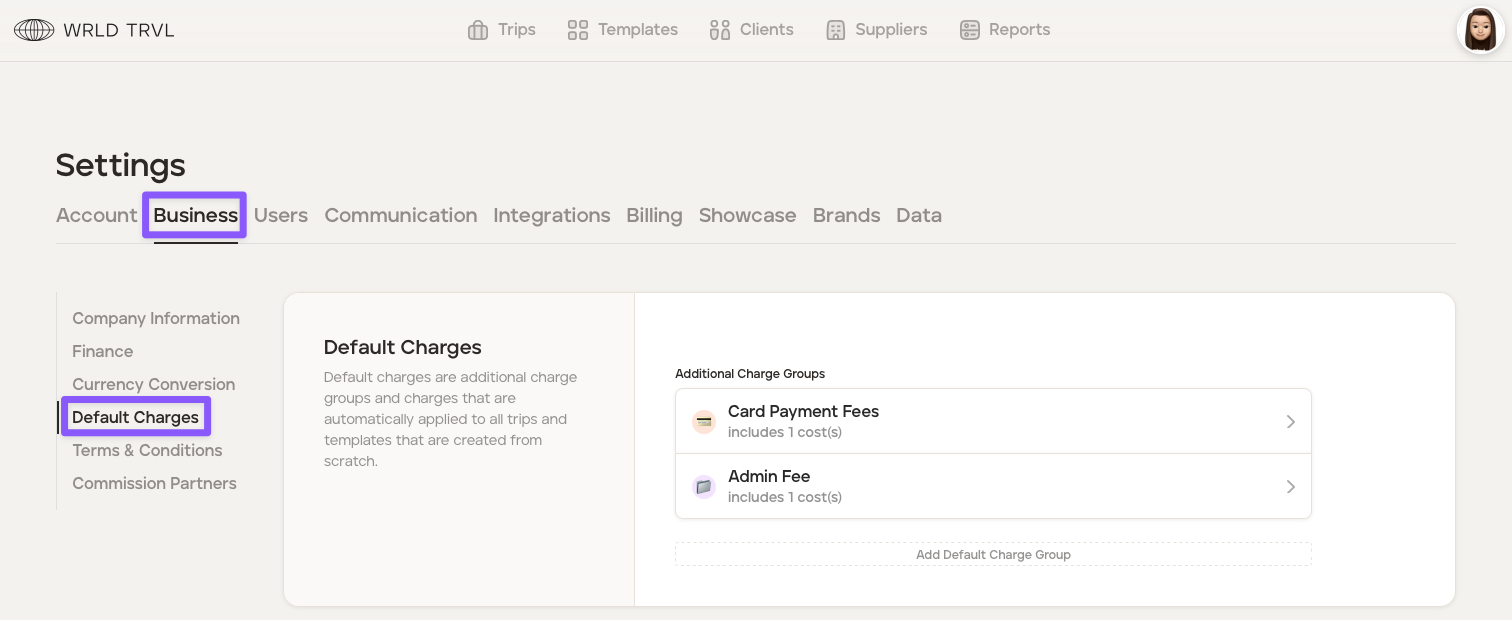
6. Add default charges to your trips (optional)
In addition to costs associated with individual itinerary items, you may wish to include separate additional charges, for example, administration fees, credit card fees, special occasion costs or, your mark-up/margin to the overall itinerary cost (if you are not adding mark-up/margin to individual itinerary items).
To set up default charges, follow the steps in the Apply default additional costs across all your itineraries article. Example in the screenshot below:
7. Add team members and teams
To add team members to your TripMapper for Business account, follow the steps below:
Remain in 'Settings' (or click the avatar in the top right corner of your screen and then click 'Settings').
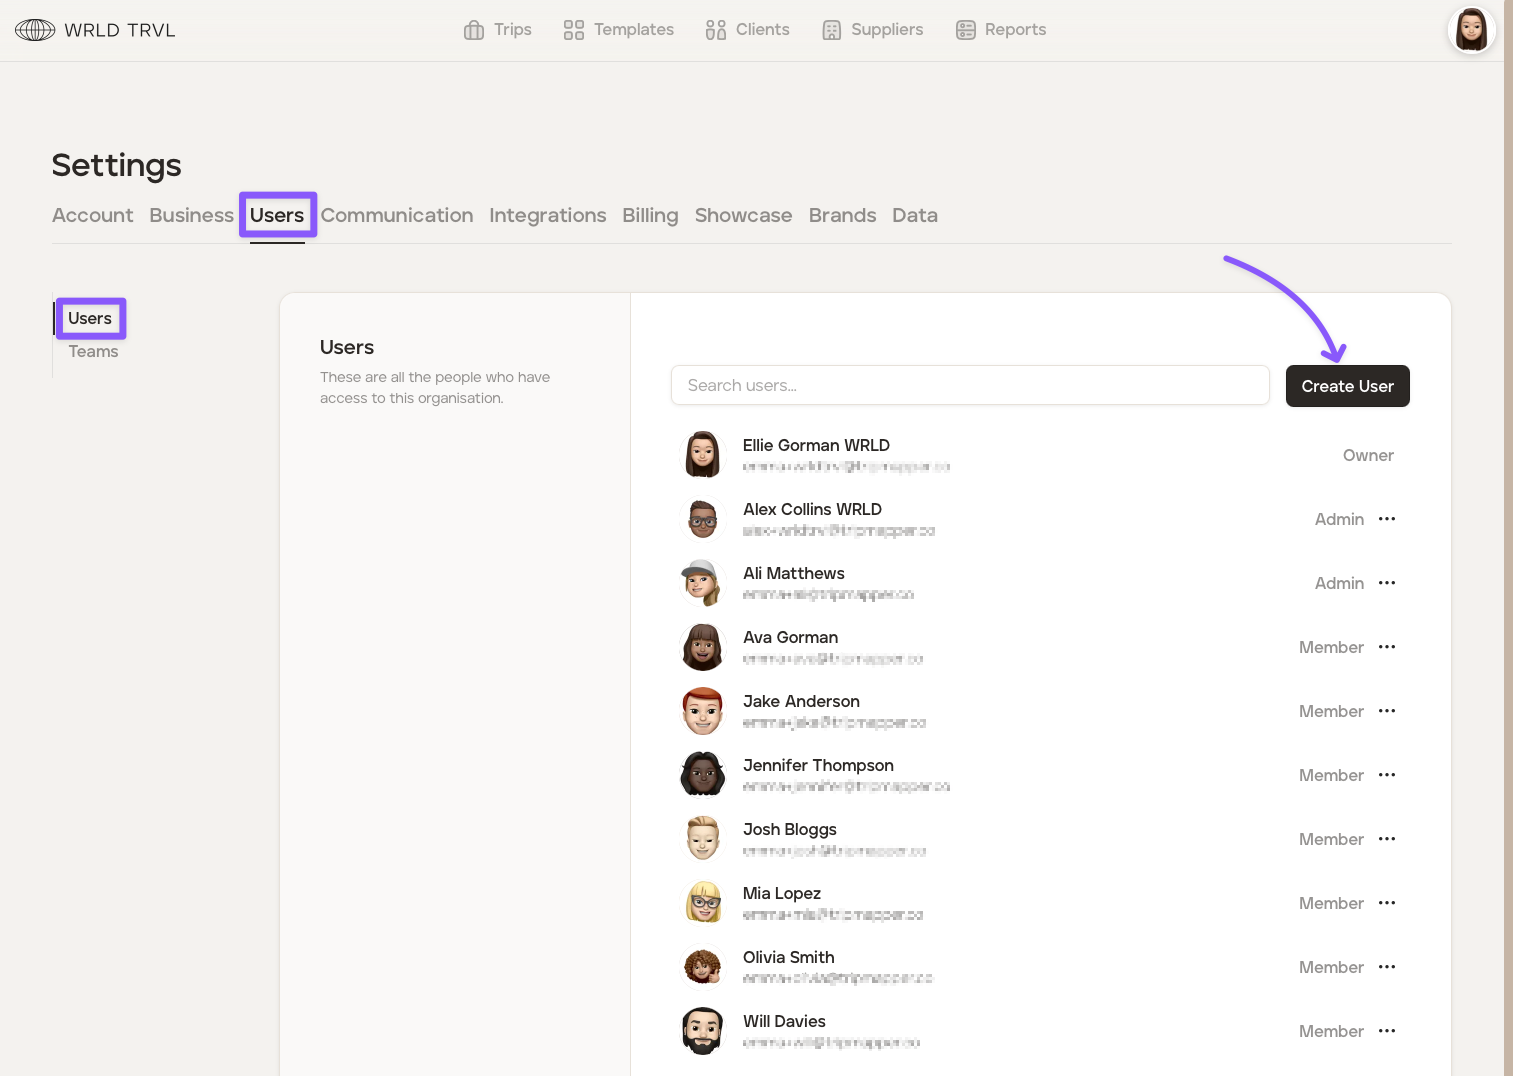
Click the 'Users' tab.
Click the 'Users' tab.
Click the 'Create User' button.
Add the:
name;
email address;
role ('Admin' or 'Admin');
cost permissions; and
team (if any)
of the team member you wish to add. They will then receive an email in which they can accept the invitation. For more information on team member permissions please read 'Team member permissions' article.
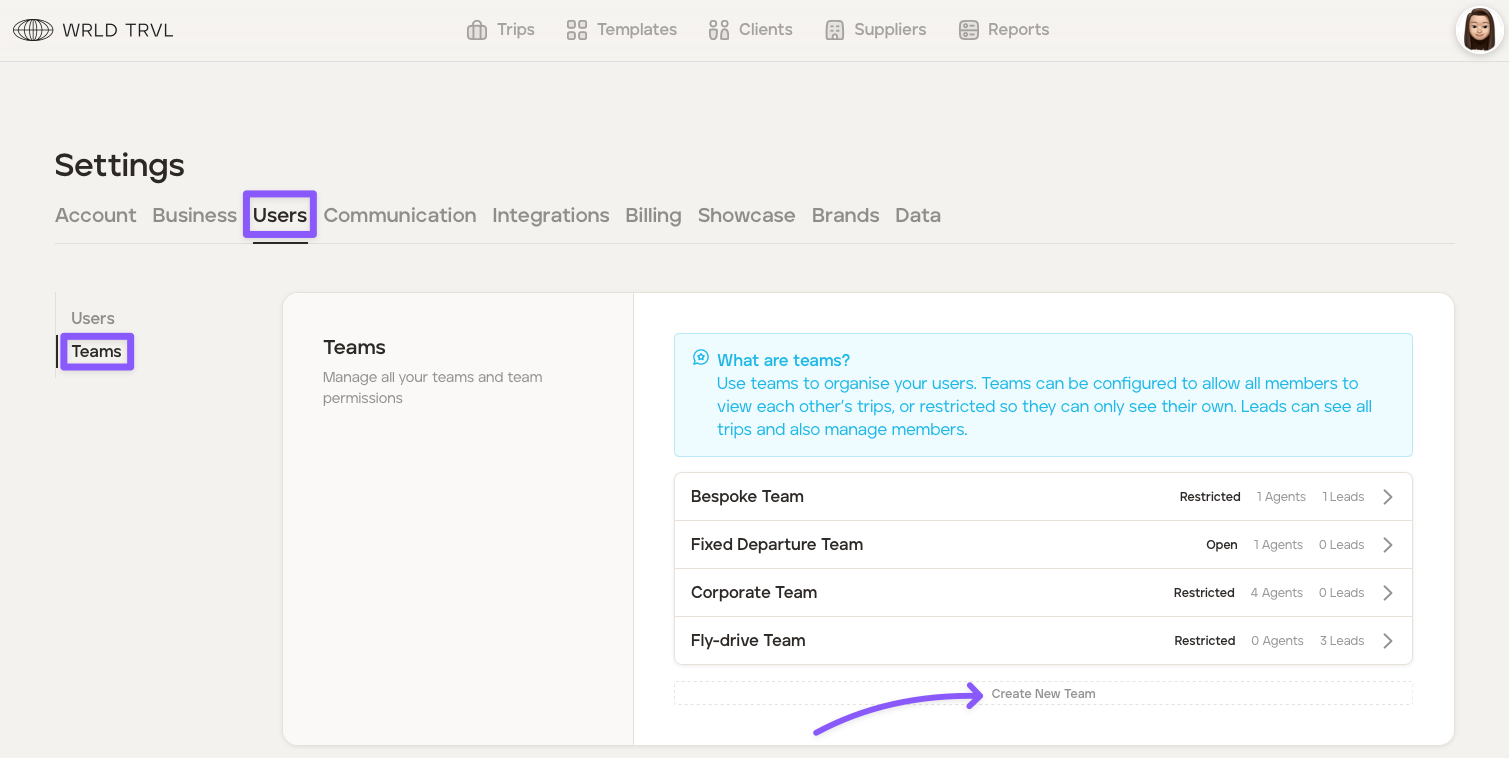
To add teams to your TripMapper for Business account, follow the steps below:
Remain in 'Settings' (or click the avatar in the top right corner of your screen and then click 'Settings').
Click the 'Users' tab.
Click the 'Teams' tab.
Click the 'Create New Team' button.
Add the team name and set the permissions of the users in that team ('Restricted' or 'Open').
Add the team 'Lead'. Leads can see all trips and also manage members.
Add team agents. Please note, only 'Members' can be added to teams; 'Admins' and the 'Owner' have access to everything by default.
8. Messaging
Our built-in messaging feature allows you and your clients to stay connected before, during and after their trip.
The messaging feature is only available once:
the messaging feature is enabled in your platform 'Settings';
the trip is an 'upcoming' trip (not a proposal);
the client has been invited to view the 'upcoming' trip on the app; and
the client has downloaded the TripMapper mobile app and signed up.
To message your client, follow the steps below:
Remain in 'Settings' (or click the avatar in the top right corner of your screen and then click 'Settings').
Click the 'Communication' tab.
In the 'Messaging' section:
turn on the 'Enable Messaging' switch;
type your out of office message in the 'Message' field; and
click the 'Save' button.

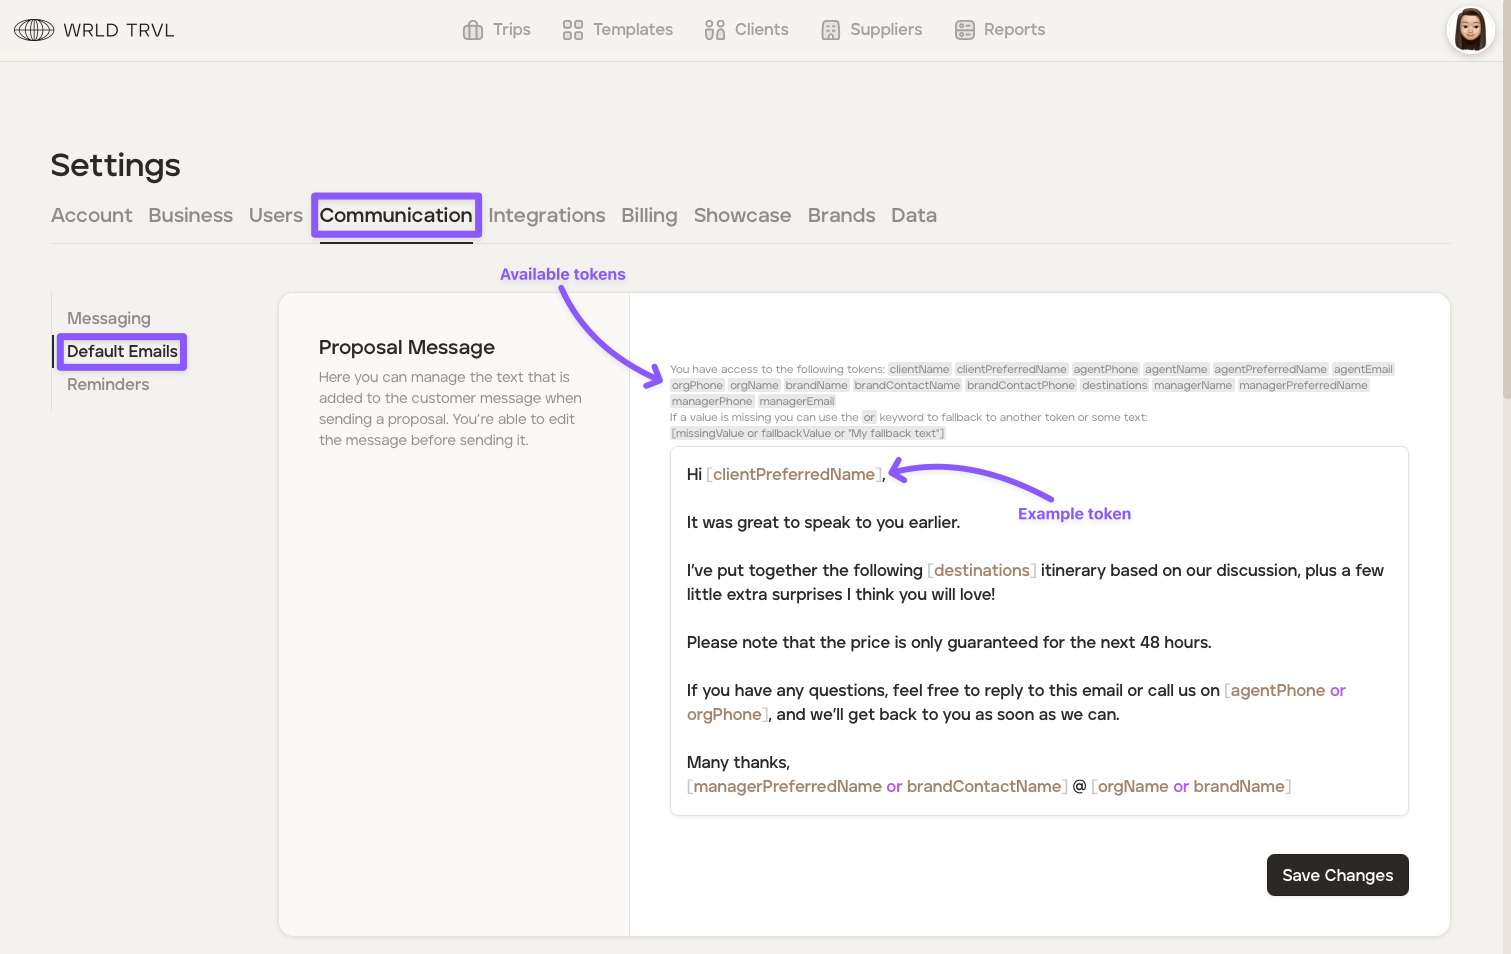
9. Set default text within emails sent via the platform
You can set your own default text that is added to your emails when sending:
an email to a client containing the proposal link
an email to a supplier (in your supplier database) requesting availability
an email to a supplier (in your supplier database) when reconfirming a reservation
an email to a supplier (in your supplier database) when making a booking
You are still able to edit the default text for a particular email before sending one of the above emails to your client (this will not change the default text in the account 'Settings'.) To set your default text, follow the steps below:
Remain in 'Settings' (or click the avatar in the top right corner of your screen and then click 'Settings').
Click the 'Communication' tab.
Click the 'Default Emails' section.
Edit the text in each of the emails as you wish, using the tokens available (for example, [clientName] or [agentName]) for the relevant email. Once done click 'Save Changes'.
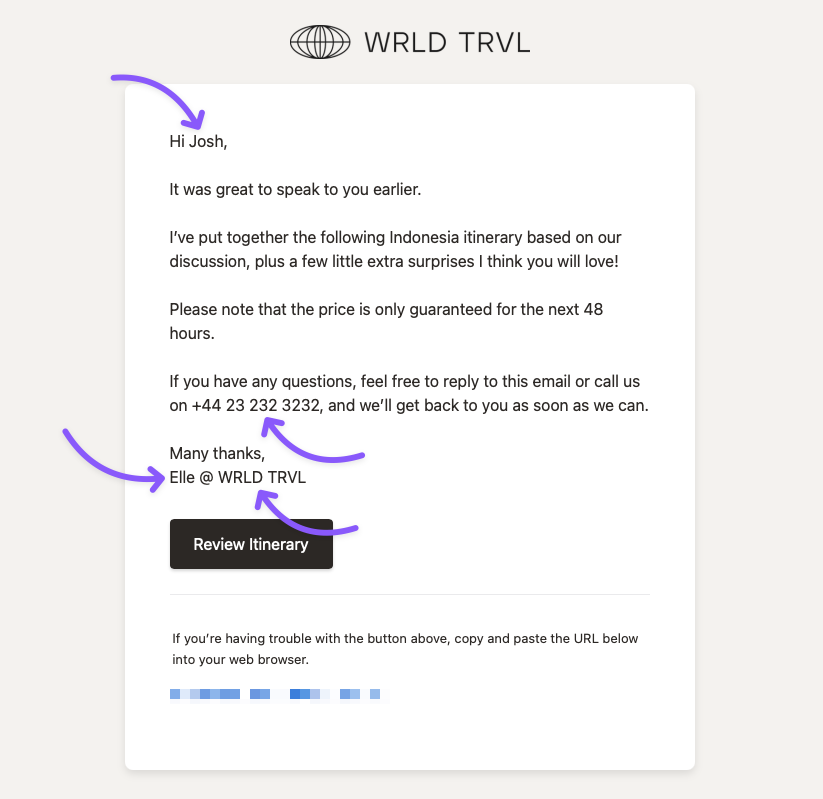
When you're ready to send a proposal to your client, the default email you've set in the platform 'Settings' above will show, but you are still able to make changes to the email prior to sending to the client if you wish to do so (which will not affect the default email in your account 'Settings'):
Example:
For example the agent, Ellie Collins, has input the following information innto the platform:
The agent added the following information to the client database:
Full Name: Joshua Jones
Preferred Name: Josh
Your details contained within the account settings are as follows:
Full Name: Ellie Collins
Preferred Name: Elle
Agent Phone Number: No data/value input by agent
Organisation Name: WRLD TRVL
Organisation Phone Number: +44 23 232 3232
Ellie is sending her client, Joshua Smith, an email containing the proposal link, using the default email proposal message. The content of the proposal email received by Joshua Smith will look like this (the tokens have automatally populated the data/values input in the platform by the agent:
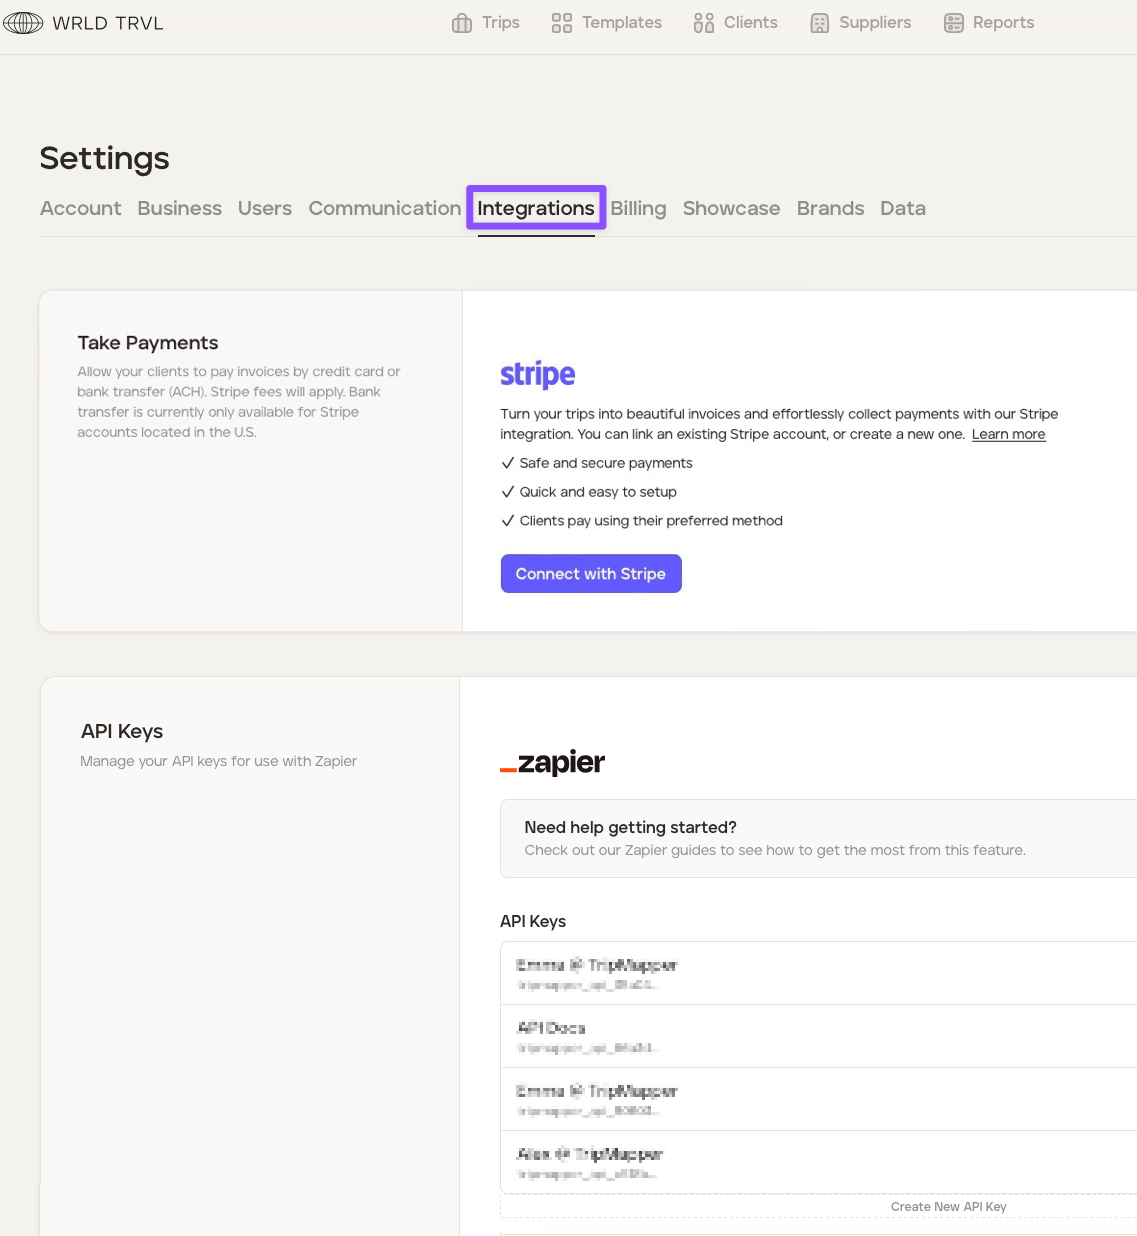
10. Stripe and Zapier integration
Remain in 'Settings' (or click the avatar in the top right corner of your screen and then click 'Settings') and click the 'Integrations' tab to integrate with other applications.
1. Stripe integration for taking online payment
Invoice your clients and effortlessly collect payments with our Stripe integration.
To set up Stripe integration, check out the Set up Stripe Integration' article.
2. Zapier integration for connecting with other applications
Connect your TripMapper for Business account with other apps and services (such as Quickbase, HubSpot, MailChimp and Google Sheets, to name just a few!), allowing you to create tailored workflows that automate tasks between the different applications to suit your specific needs.
For more information about Zapier Integration, check out the Zapier articles.
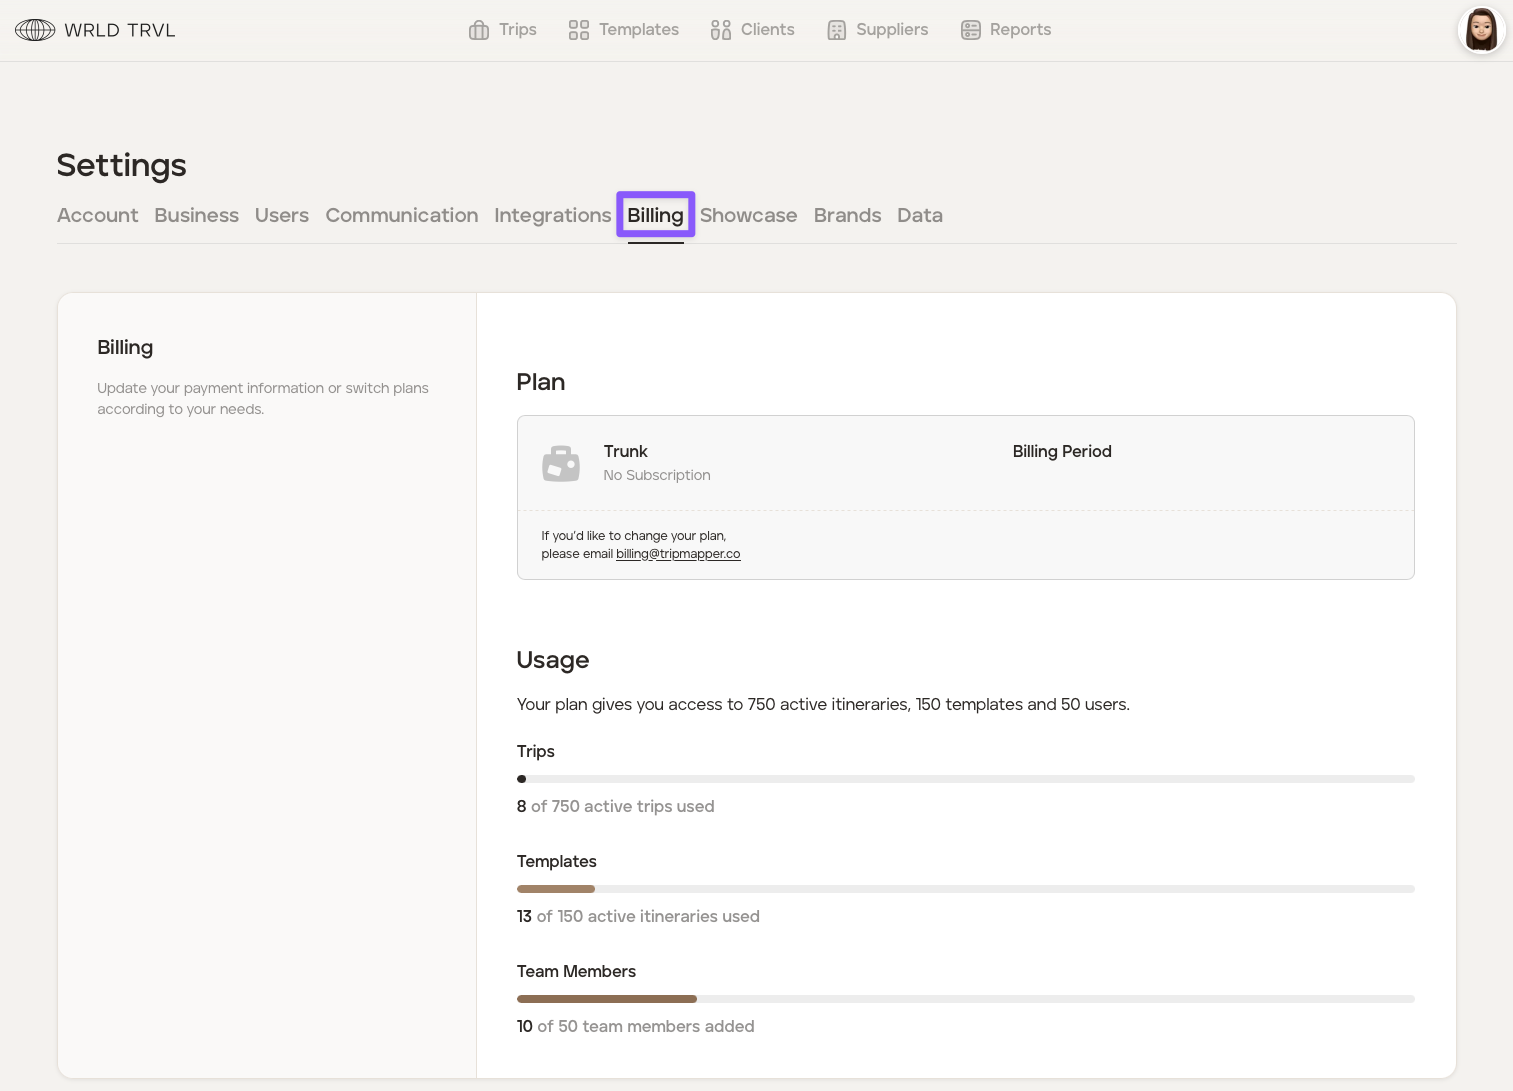
11. Billing
Keep on top of your subscription usage in the 'Billing' tab.
12. Showcase
TripMapper 'Showcase' allows you to show off your beautiful itineraries on their own pages or by embedding them into your existing site.
The main Showcase page will be branded with your logo, contain your content, and will include your chosen template itineraries. When a template itinerary is clicked by a potential client browsing your pages, they will be shown the itinerary Showcase page, which is also branded with your logo, and contains your content and imagery.
To set up Showcase on your account, check out our 'Create a Showcase page for your template itineraries' article.
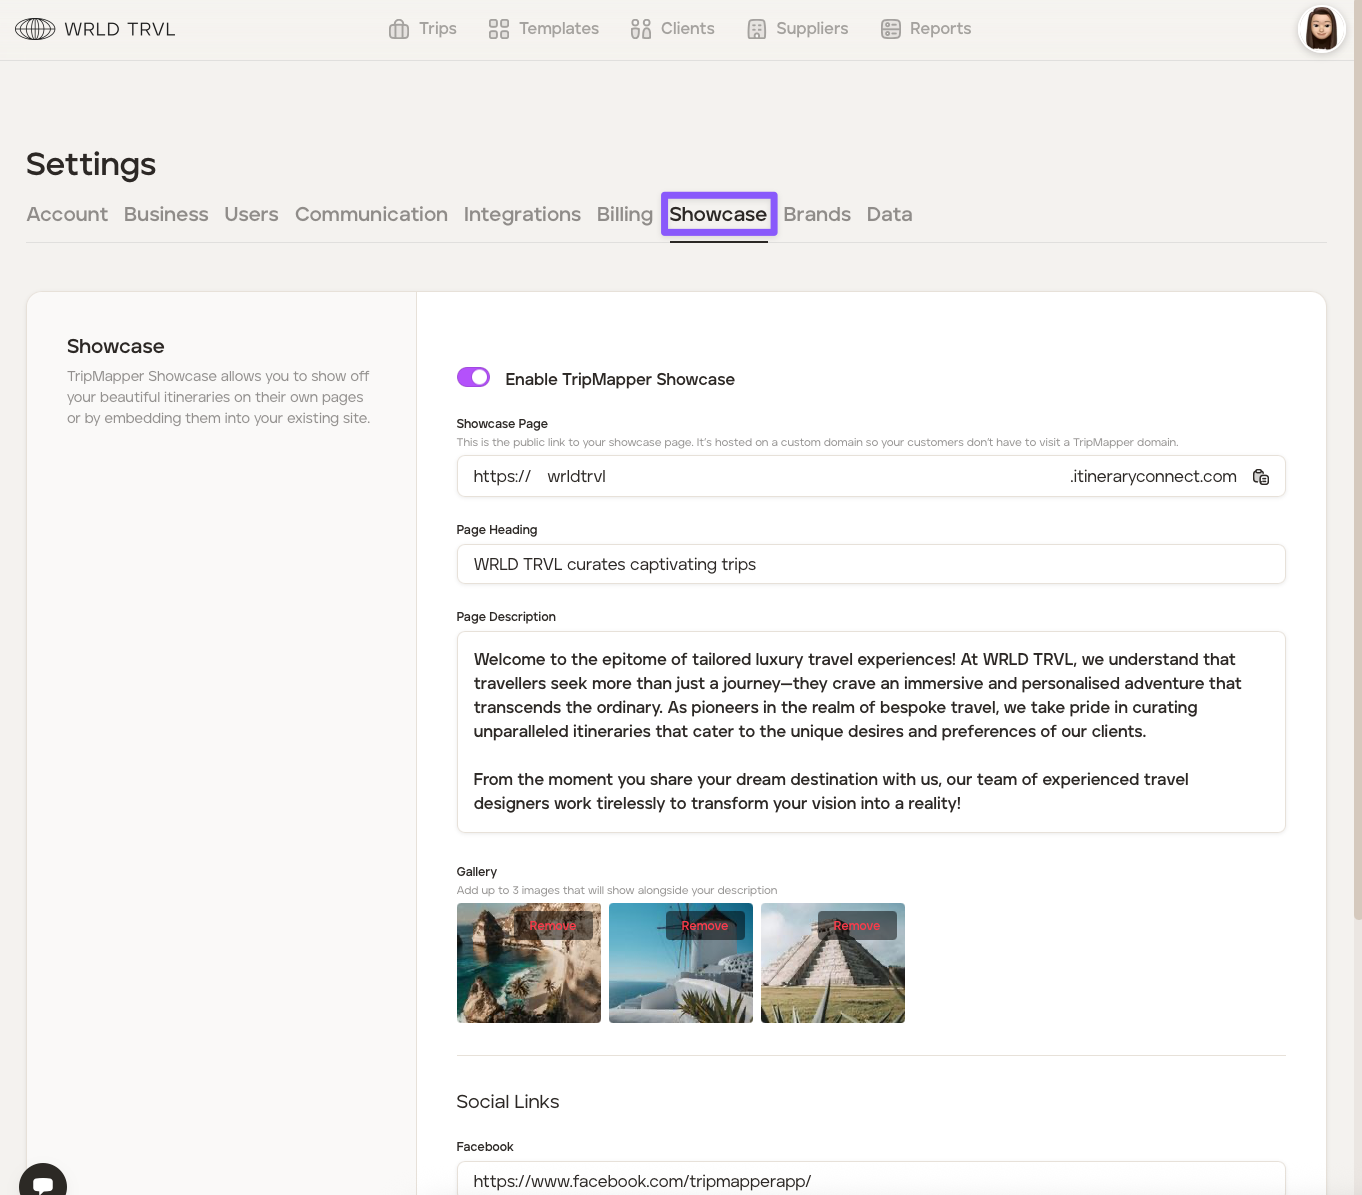
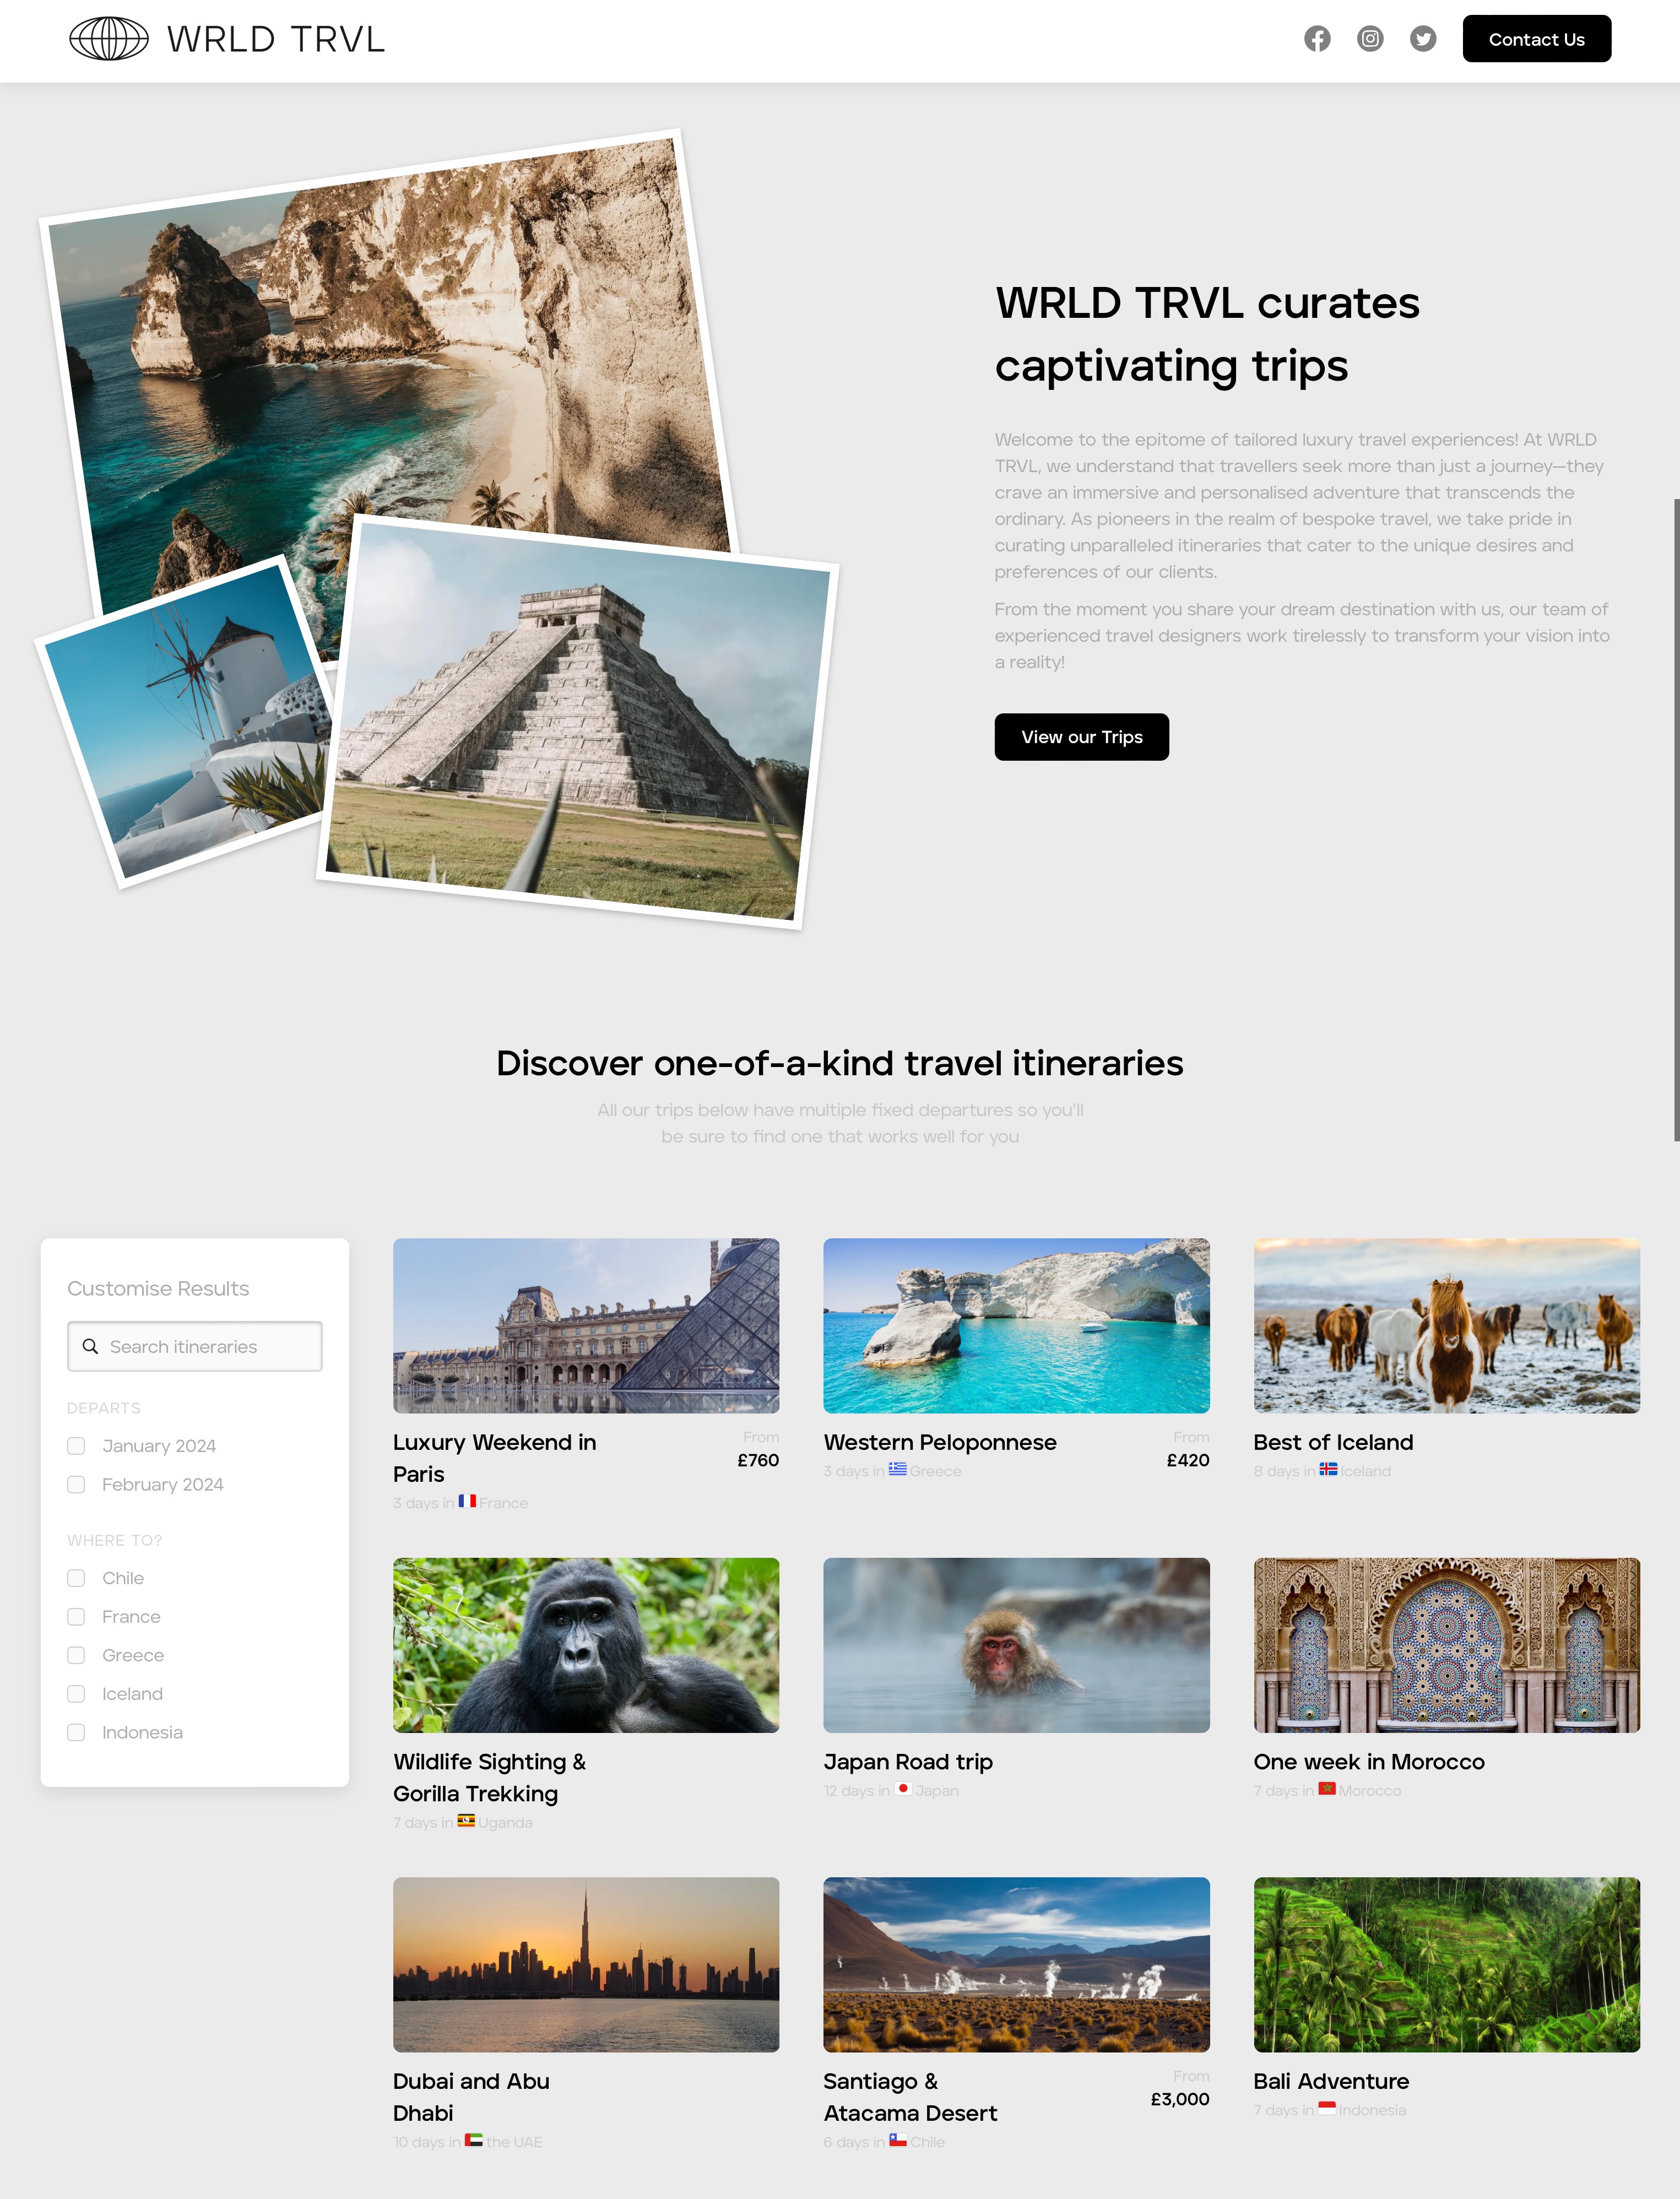
Example of a main Showcase page:
13. Adding your business partners' brands
In the 'Brands' tab you can customise and brand your digital and PDF travel itineraries with your business partners' logos, contact details and brand colours. This feature is particularly useful for tour operators and DMCs dealing directly with travel agencies.
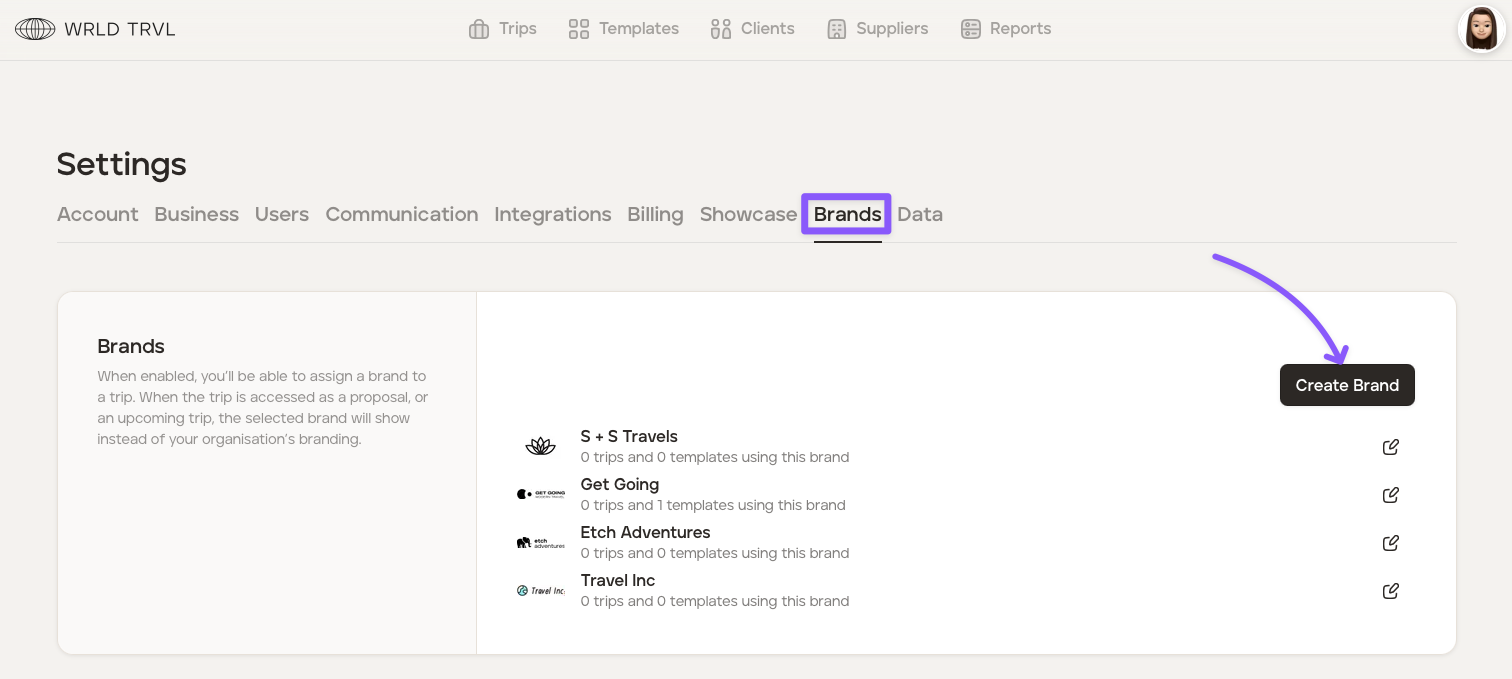
To add your business partner's branding, check out our 'Adding your business partner's branding in your settings' article.
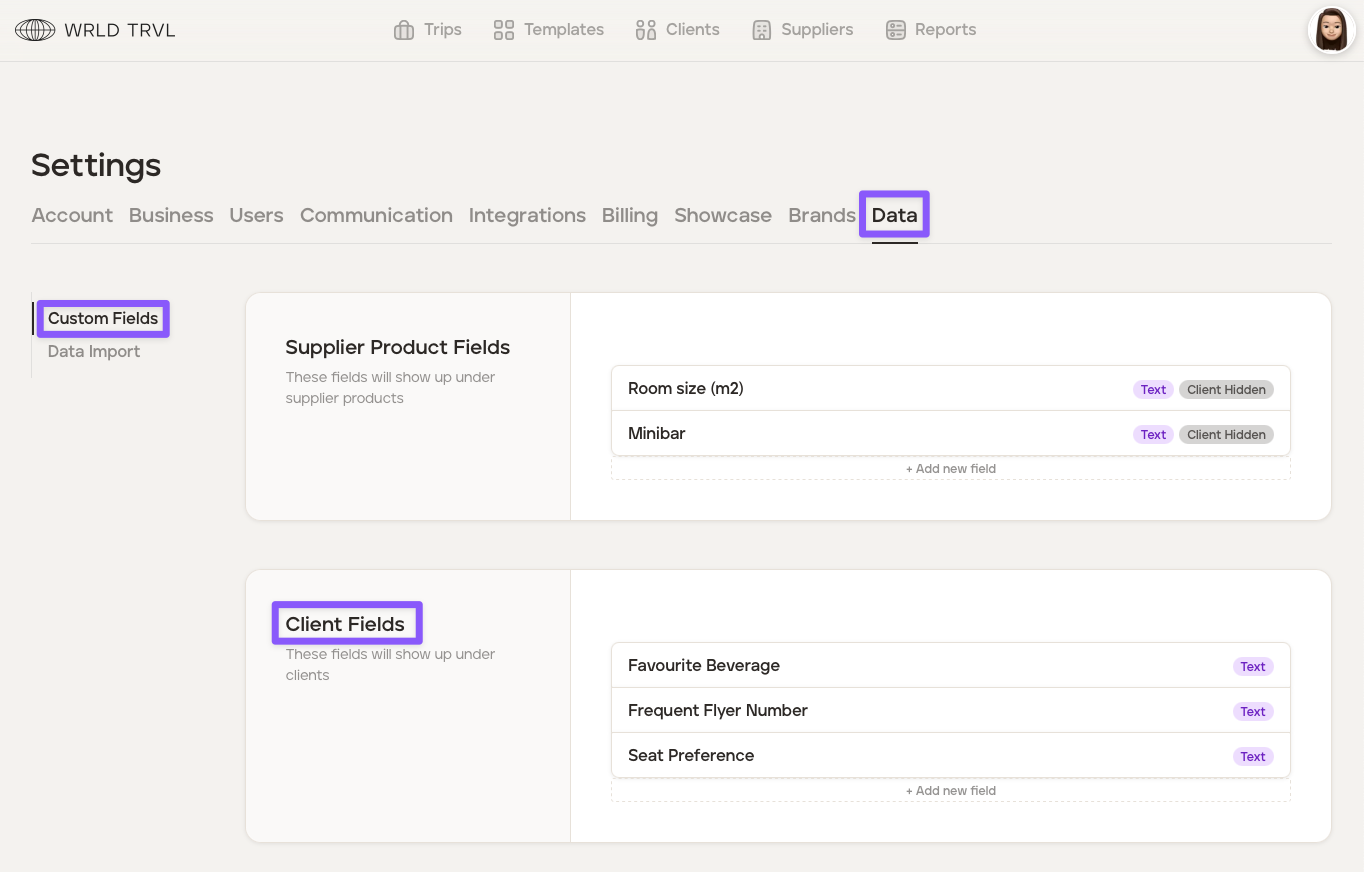
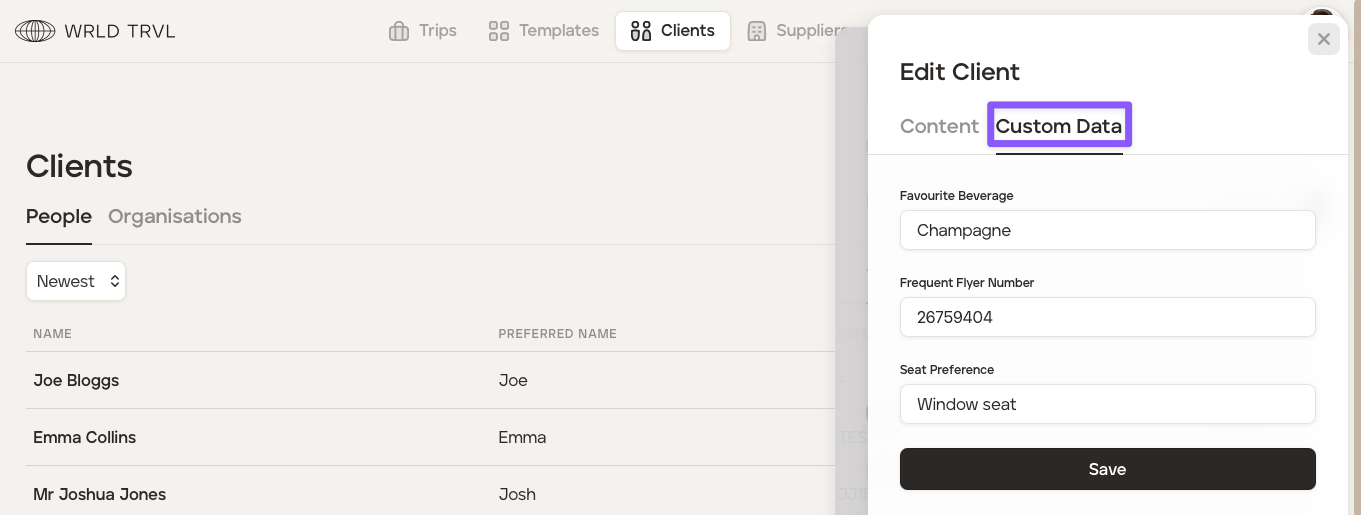
14. Adding custom fields to your client database
To add custom fields to your client database, follow the steps below:
Remain in 'Settings' (or click the avatar in the top right corner of your screen and then click 'Settings').
Click the ‘Data’ tab.
Click 'Custom Fields'.
In the 'Client Fields' section click '+ Add new field'.
Name the field, for example, 'Favourite Beverage' or 'Frequent Flyer Number' or 'Seat Preference' and click 'Create.'
Repeat steps 4-5 to add further custom fields.
You can populate the data for clients in the 'Client Database'. To do so:
Click the applicable client and then click the 'Edit' icon.
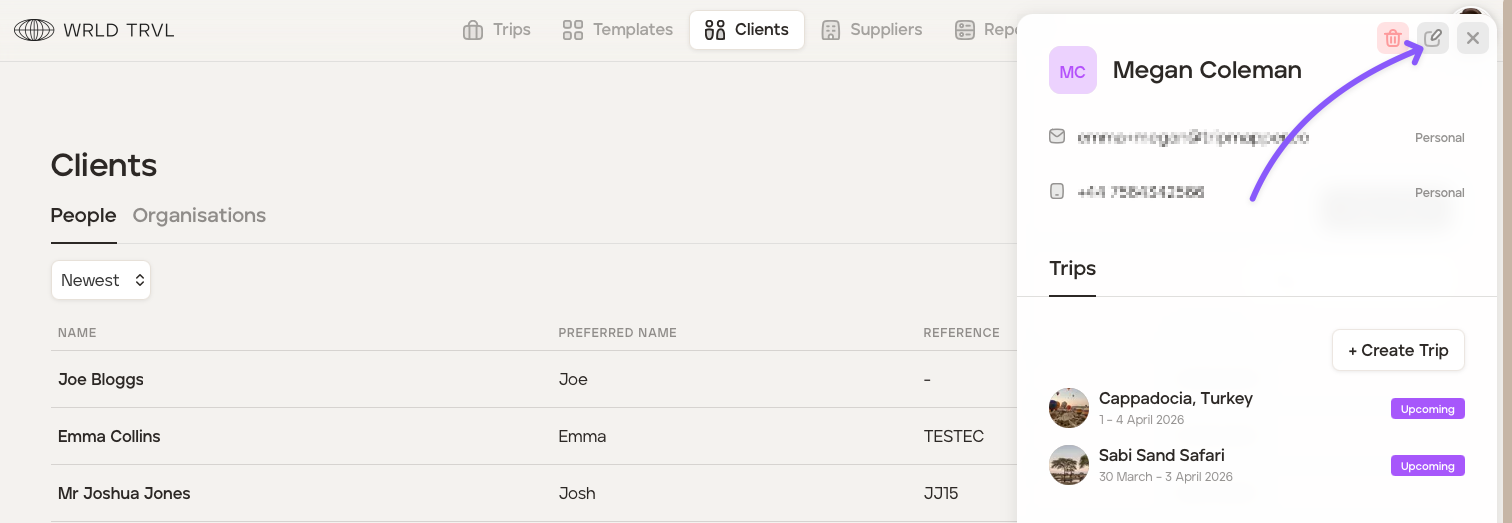
Click the 'Custom Data' tab, input the information in the custom fields you created and click the 'Save' button.
15. Import data
It may be possible to import your data directly into TripMapper for Business with bespoke data importing. To enquire about data imports, contact the TripMapper team (hello@tripmapper.co).
Create itineraries!
Now you are set up in the 'Settings' section, start to use TripMapper to create and send travel itineraries!
To learn how to create your first template itinerary, click here.
To learn how to create template cards, click here.
To learn how to create your first proposal from a template itinerary, click here.
To learn how to create your first proposal from scratch, click here.